info@theculinarycatalysts.com
- From Garden to Plate: Fresh Flavors, Naturally Grown
info@theculinarycatalysts.com
Experienced gardeners are well aware of this reality and have even come to enjoy the ephemeral nature of their outdoor spaces.
gardening experts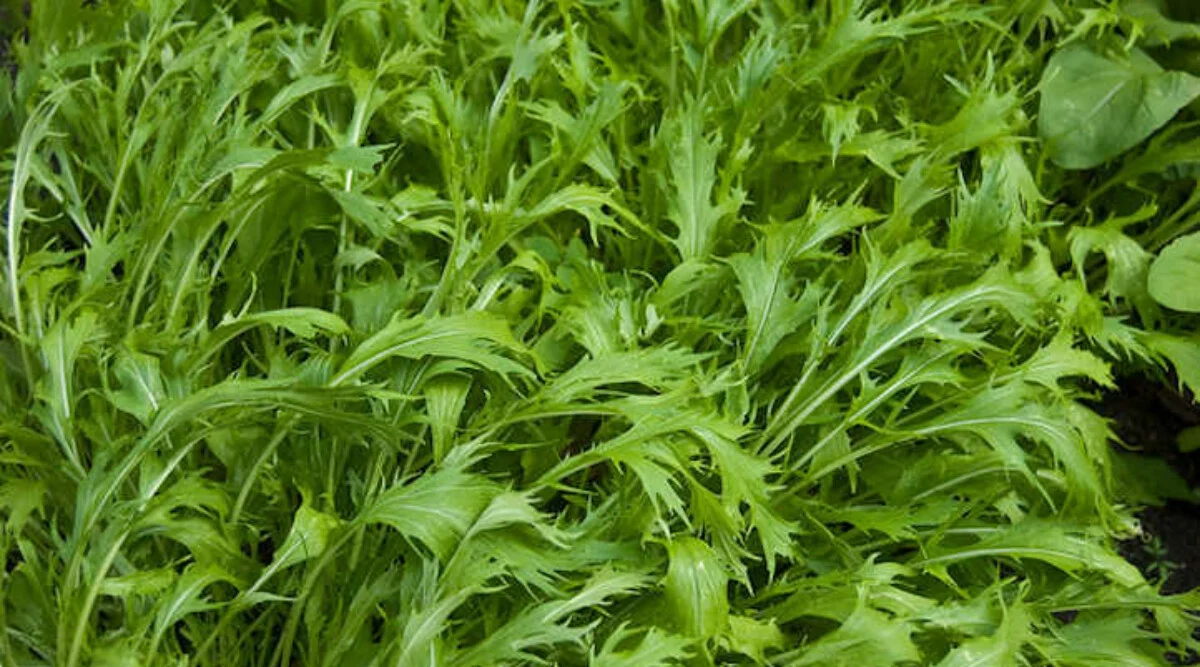
Growing mizuna to add to salads, soups, or stir-fries is incredibly easy. Our complete growing guide provides you with our top tips! Stir-fries in spring and salads in the middle of summer both have one thing in common – the peppery and wonderful vegetable that is mizuna! An addition to the garden that produces early in the season and can tolerate the type of weather fluctuations that gardener nightmares are made of, these wonderful little plants will give you harvest after harvest of delicious greens for months. Growing mizuna greens should be on the garden plan of any family who loves to cook. Native to the Kansai region of Japan, these seeds have now traveled the globe and are grown in zones USDA 3-10. They were also grown in outer space as part of a vegetable growing experiment on the International Space Station! These distinctive plants spring up from the soil almost overnight and make great salad, stir-fries, and shabu-shabu among other dishes. Traditionally, many chefs have pickled the mizuna’s tender green leaves to make a variety of side dishes. Some plant mizuna varieties that are purple because of the presence of anthocyanin, the same compound that turns blueberries blue! Similar to the taste of arugula, you can tell them apart by the distinct mustard aftertaste of the mizuna. This plant does especially well when grown in rotation with legumes. A heavy nitrogen feeder, it will happily soak up the nitrogen that legumes ‘fix’ in the soil. All About Mizuna Japanese mizuna greens have long been a staple of Asian cooking, as the plant originated in Japan. Like other greens mizuna go by a long list of names like Japanese mustard, potherb mustard, California peppergrass, shui kai, and spider mustard. A peppery and spicy vegetable, this versatile addition to the garden can be grown year-round in some regions and is valued for its wonderful nutritional content. A member of the brassica family, it’s actually in the same family as cabbage. Unlike other brassicas, mizuna can tolerate heat and cold weather to a better extent. Mizuna greens are foot-tall clumps of green serrated leaves with thin stems. While some cultivars also produce purple leaves like ‘Mizuna Crimson Tide’, this plant is added to gardens almost exclusively for its leaves. A quick grower, small grey seeds quickly sprout into sturdy leaves in small circular clumps. Near the end of the plant’s life, it will bolt and go to seed-producing small yellow flowers on long green spikes above the plant. Planting Mizuna It’s best (and easy!) to grow mizuna from seed. A small round grey seed roughly the size of a lentil, it’s easy to sow. Sow seeds to 1/4th to 1/2 inch deep in well-drained rich soil. Plant in rows 18-24 inches apart. After sowing seeds, plants will germinate in 4-7 days if temps are between 45-85 degrees. Once the seedlings reach 1 inch in height, thin to 6 inches apart. You can expect a harvest 3 to 6 weeks after germination. It’s best to plan on planting your seeds two weeks after the last frost, but if grown in areas with no frost, mizuna can be planted in the garden in late summer. Care A hardy choice, mizuna has a few basic growing requirements. Plant mizuna in a sunny area with well-draining and fertilized soil and you’re already off to a great start! Sun and Temperature A great choice for a northern garden that gets the occasional late frost, mizuna is a hardy little green that once established can take a sudden and unexpected frost. As such, it can be one of the earliest crops in the garden. Likewise, for a southern garden, these plants can tolerate hotter weather than most other greens. Able to grow in USDA zones 3-10; mizuna grows best in the full sun of the day but can tolerate partial shade. Requiring 10-12 hours of sunlight, try planting in an area that will receive little if any shade. Additionally, sow several inches apart so that fully grown plants don’t shade out plants that are regenerating themselves. Water and Humidity Moist soil is the key to happy mizuna! Its leaves contain a great deal of water, and if the soil dries out, it can cause your mizuna to go to seed. Mizuna greens need to be watered in the morning, preferably on a drip system. Early in its life, try watering your mizuna twice a week to keep the soil evenly wet. After the leaves grow and shade the soil surrounding itself, decrease to once a week. Water one inch a week, and add a light mulch of straw or fine wood chips around the seedlings. In spring and fall, reduce watering if the soil becomes waterlogged. In Summer, monitor the soil if it dries out quickly in heat or warm winds. Soil It’s best to grow mizuna greens in well-drained rich soil. Ideally, amend the soil with compost or sterilized manure before sowing seed. Mizuna thrives in most soils but needs a pH of between 6.0-7.5. If growing in containers, coco coir is a great choice as it aids in drainage. But again, don’t allow it to dry out as it will start to go to seed. Fertilizing Mizuna greens have very simple fertilization requirements. As these plants are grown for their leaves they need a lot of nitrogen! When you first sow your seeds, work well-rotted manure into the soil. This will provide nitrogen early in the plant’s life. After about one month, apply a liquid seaweed solution or fish emulsion to keep the mizuna growing well. Reapply every month or so or as needed. Pruning Mizuna greens are a very rewarding crop. As it’s easy to grow mizuna, once established, mizuna will tolerate several rounds of cutting. Once the leaves reach between 10-12 inches in length, cut the stems to about 1 inch off the ground. It’s best to use a sharp or serrated knife and cut parallel to the ground. After cutting, water the area and ensure the soil stays moist. In a few short weeks, you’ll be able to harvest again! Propagation Mizuna greens are exclusively grown from seed. A fast-growing harvest, either sow seed or purchase seedlings. Seeds are hardy as well! They have great viability when saved for up to 4 years! Harvesting and Storing Harvesting mizuna is as simple as snipping a delicious green leaf. A great cut and come again option, this Japanese mustard is a bountiful addition to the garden. Harvesting Mizuna, like any green, can be eaten at even the earliest stages of growth. However, it’s best to harvest mizuna between 20 and 40 days after germination. Many gardeners like this Japanese green when it’s still in a relatively young stage as tender greens. Others prefer to let this green get upwards of 10 inches long before harvesting. Cut the greens at the base of the leaf leaving inner growth undisturbed. Storing Once picked, store unwashed mizuna greens in a salad spinner or breathable bag in the fridge. Make sure to avoid storing in a sealed plastic bag as this will cause the green leaves to immediately begin to decay. For long-term storage, try pickling your greens. Japanese chefs and home cooks have long been pickling these sturdy greens and using them as a condiment. Pickling is a common method of preservation in Asian cooking. Many recipes abound for pickled side dishes. A short search will bring up lots of delicious options! Troubleshooting You’re in luck! Mizuna greens are a relatively easy plant to grow. Monitor outdoor temps, keep your soil moist, and use a row cover and you’ll likely have a trouble-free crop in a month or so! Growing Problems Mizuna greens are a very hardy green. Able to withstand warm summer weather better than most other greens, you can harvest mizuna up into the 80’s. Keep in mind however that it can bolt. Bolting happens when your mizuna tries to reproduce and grows seeds for another generation of plants. To avoid bolting, ensure that the soil around the base is continuously moist as dryness will trigger the plant to reproduce. Alternatively, if you’re expecting weather over 85 degrees, you can expect to see the end of harvest. Pests Flea beetles are the primary pest you’ll come across when caring for mizuna. These beetles lay their eggs on the soil surface not too far from the stalks. The larvae hatch and eat holes in the stems and leaves. To prevent flea beetles, cover your crop with a row cover, this prevents the beetles from physically laying their eggs anywhere near your plants. Aphids are small light green bugs about 1/8th of an inch long. They usually appear in groups and suck the sap of the plant. They multiply rapidly and can kill a plant by eating too much and introducing disease into the weakened plant. Use insecticidal soap & pyrethrum to control. Diseases Mizuna greens are not very susceptible to disease. The one exception is damping off, a disease most likely to happen when you sow seeds in trays indoors. Damping-off presents as a fuzzy mold on top of the soil and stems that appear shrunken or eaten. There is no cure, but it can be prevented by increasing ventilation or spreading sulfur powder over the affected areas to stop the spread to surrounding seedlings.
Read More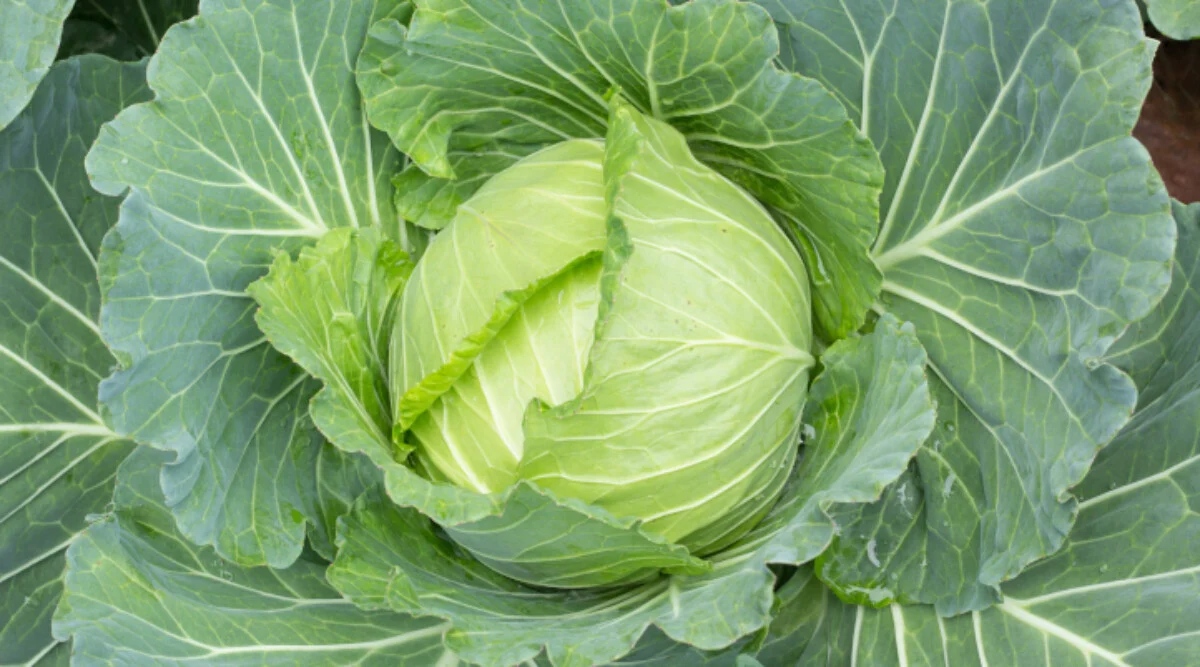
Love fresh cabbage? So do we. Growing cabbage isn't difficult and supplies you with big heads of nutrition-dense produce. We'll show you how!Cabbage is one of those old-school crops that is easy to grow. It’s resistant to the cold, highly nutritious, and easily cooked into a variety of dishes. Growing cabbage in your garden is a great way to learn how to grow food in your garden, as it’s easy enough for beginners but can challenge even experienced gardeners. Plus, the impressive heads are eye-catchers, filling up garden beds nicely. Due to its long history of cultivation, cabbage varieties have been adapted to grow year-round in diverse climates. Cabbages were a staple crop for peasants in Northern Europe. With its cold tolerance and excellent shelf life, cabbage was a safety net for rural farmers. Cabbages are rich in vitamin C, calcium, and phytochemicals. The purple varieties especially are high in anthocyanins (a compound found in purple produce such as blueberries and beets), which have been shown to possess cancer-fighting properties. Not only are they nutritious, but growing cabbage also has the added benefit that it can develop new growth after harvesting.
Read More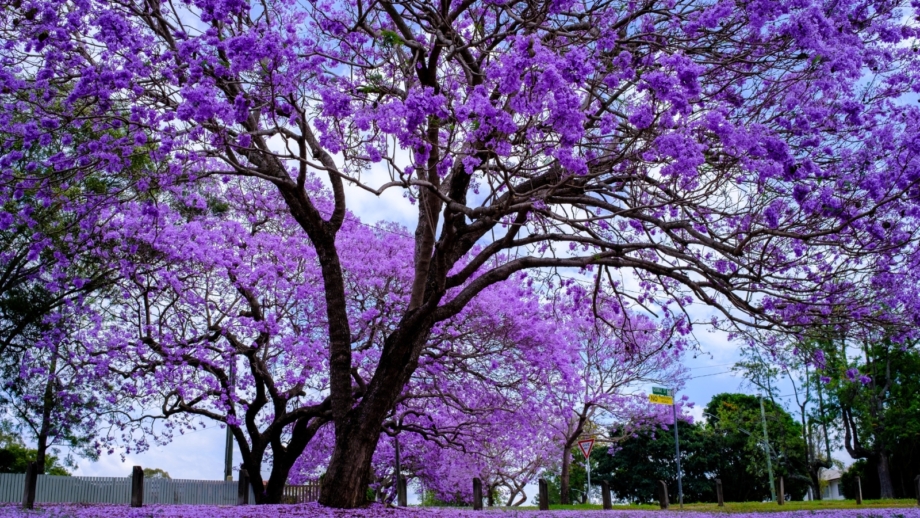
When it comes to tropical, flowering trees, few specimens hold a candle to the magical and beautiful jacaranda tree. If you’re planting one of these special trees, there are a few important factors to consider. Here, gardening expert Melissa Strauss will help you get off on the right foot with your beautiful tree. Jacaranda mimosifolia is a stunning landscape tree. It is best known for the abundance of bluish-purple flowers it produces in the spring. In warmer climates, it can bloom at any time of year, but spring is the most common bloom time. I remember the first time I laid eyes on one of these trees in bloom. They are simply magnificent and stunning. Not only do they have great ornamental value, they also make excellent shade trees. They grow quickly, and have a lovely umbrella-shaped canopy once mature. The jacaranda tree is in cultivation in most areas of the world with tropical and subtropical climates. There are a large quantity in Pretoria, South Africa. The sheer number of them has earned the city the nickname “Jacaranda City.” In the United States, they are very popular in California, Arizona, Florida, and Hawaii. J. mimosifolia is native to South America. Specifically, you can find it growing naturally in southern Brazil, southern Bolivia, Paraguay, and northwestern Argentina. It grows in wooded ravines, bushlands, riverbanks, and grasslands. Much of the native population has been threatened by deforestation for agriculture and logging. This is a beautiful semi-evergreen or deciduous species that can reach heights of 25′-50′ tall at maturity. It grows very quickly, putting on three to four years of growth per year in its first few years. In its first year, a jacaranda is capable of growing up to ten feet tall. This is only under optimal conditions, though. When grown in tropical conditions, a jacaranda tree will be closer to its full 50 feet tall at maturity. In cooler, subtropical climates, the tree will be smaller. The canopy of a full-sized mature jacaranda can be as large as 30 feet wide. Once established, it is drought tolerant. The canopy is lush and rounded, making it an excellent shade tree. It can be single or multi-trunked, depending on pruning. It has a large, open canopy. The foliage is feathery and fernlike, and the leaves can grow to a foot long. The bark is thin, gray and smooth on young trees, developing fine scales as it ages. In early summer, large clusters of flowers form all over the canopy. The blooms are trumpet-like and the most stunning shade of purple. The flowers persist for up to two months. A mature tree is a breathtaking sight during the summer months. As a landscape element, this tree gets major points for its ornamental value. It has a lush, tropical appearance, and makes a nice shade specimen. The wood is smooth, pale, and hard. It is often used in carpentry, and for making carvings and handles for tools. In tropical climates where the tree is common, you’re likely to see it at local nurseries and landscape supply stores. You might find it near another type that it resembles, the Royal Poinciana. The two are similar and need similar care. Small, young trees are available at several online retailers. This is a large tree, and that needs consideration when choosing a location. It has roots that grow close to the surface, so plant it away from sidewalks and other concrete slabs to avoid disruption. Choose a location that receives at least six to eight hours of sun daily. Plant in spring or fall so that it has time to establish while the weather is mild. Water your tree well a few hours ahead of planting to minimize stress. Dig a hole that is as deep and twice as wide as the root ball. No need to dig down deeper as long as the soil is loose. Transfer the jacaranda into the hole, position it as you prefer, and backfill with native soil. Mulch over to hold in moisture and protect the shallow roots, keeping the mulch away a few inches from the trunk. For the first month, water two to three times per week. If the leaves look wilted, water. After the first month, you can ease off of watering gradually. As long as you don’t see the leaves wilting, it should be fine with watering once per week for the duration of its first year.
Read More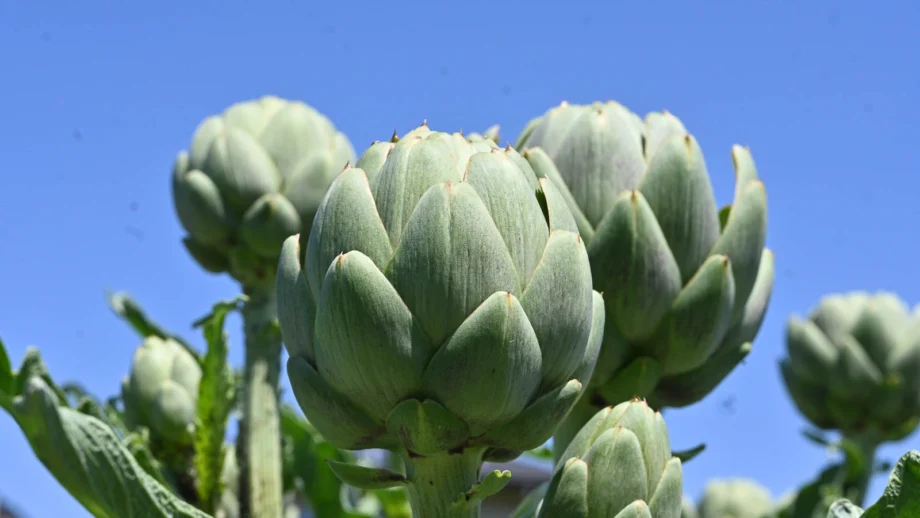
We don’t give artichokes enough credit. They may descend from thistles and have a funny name, but these are actually very interesting veggies! Taste-wise, artichokes are delicious, especially dipped in melted butter. They have a nutty flavor and are surprisingly meaty in texture. Historically, the close relatives of artichoke plants were used medicinally. Today, we enjoy this unconventional veggie on pizza, in soups, or all on their own. What is an Artichoke? Artichokes are actually unopened flower buds. They have pointed leaves, called bracts, that wrap around the artichoke heart and developing flower. Depending on variety, the bracts are usually blue-green and dark purple. If left to blossom, the bracts open up to reveal fluffy, thistle-like flowers in bright blue-violet. So how do artichokes grow? The plant itself is fairly large. It can reach five feet tall and two to four feet wide. It grows clumps of stalks adorned with jagged leaves and, in some varieties, spines or thorns. Grow artichokes as part of decorative landscaping. They add a whimsical look that you just can’t get with run-of-the-mill garden flowers. The globe artichokes that we’ll be focusing on are a subgroup of Cynara cardunculus, known as cardoon, which is an edible, clumpy weed that’s sometimes grown as decorative plants. Artichoke falls under the Scolymus group of this species, which is less weed-like and commercially cultivated. If left to their own devices, these plants can revert to their wild and weedy roots. Native Area Artichoke farm with rows of artichoke plants in a field. Because they’re from the Mediterranean, artichoke plants prefer mild winters and cool summers. Artichokes originated in the Mediterranean and date back to at least the 5th century BC. They didn’t make their way to the US until the 1800s but became a big hit. Today, over three-quarters of commercial artichokes come from California, mainly in Monterey County. There’s even an artichoke festival in Castroville every May celebrating this fantastic produce. Because they’re from the Mediterranean, artichoke plants prefer mild winters and cool, long summers. The ideal artichoke growing zone is 7-10, though many gardeners in zones 5 and 6 have success as well. It’s possible to grow artichokes as annuals in colder zones, but they don’t produce optimally until their second year of life.
Read MoreFind and share everyday cooking inspiration on Allrecipes. Discover recipes, cooks, and how-tos based on the food you love and the friends you follow.
We’re hot and spicy… literally!

SURF AND TURF made in less than 30 min! The steak + scallops are so perfectly cooked with the best garlic butter sauce!
Read More
Amazingly cheesy, creamy, comforting ravioli made in 30 minutes or less, perfect for those busy weeknights!
Read More
This comes together so quickly with just 5 min prep. It’s the perfect and easiest side dish to any meal!
Read More
The best and easiest mushrooms ever! It’s so good, you’ll want to make it every single day of the week!
Read MoreOur email newsletter delivers gardening solutions, new recipes and special
The Culinary Catalysts updates. It's always free and you can unsubscribe any time.
We really want to enable home cooks, all things being equal, to plan delightful and exceptional dinners in their own kitchen.
Know More