info@theculinarycatalysts.com
- From Garden to Plate: Fresh Flavors, Naturally Grown
info@theculinarycatalysts.com
Experienced gardeners are well aware of this reality and have even come to enjoy the ephemeral nature of their outdoor spaces.
gardening experts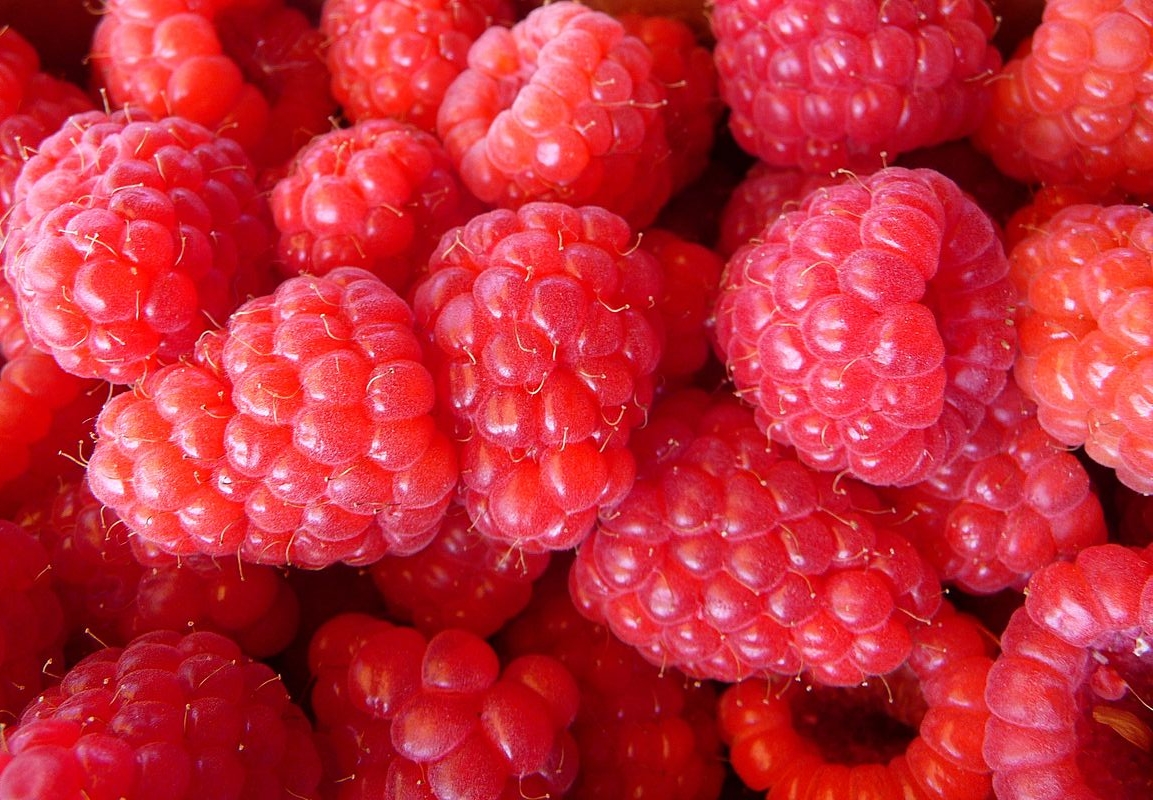
When you choose your raspberry plants from our Nursery, don't be surprised to see plants that look too small to bear a bountiful harvest. Take our word that with the right environment and care, you'll have plenty of sweet treats. There are two types of raspberries to consider: everbearing will usually give you a crop mid-summer and in early fall, while summer-bearing varieties will give you one big harvest in late summer. Planting Raspberries Choose a location that receives full sun to part-sun and has well-draining soil. Consider your space and plant supports before putting your cane fruit in the ground. Raspberries benefit from having a support system. The traditional method of trellising cane fruit (raspberries, blackberries, etc.) is to create two rows of posts and tying up wires, although stakes and twine also work. Raspberries also have roots that travel and will sprout new canes. Be mindful of where you're planting; it's a great idea to give them their very own garden bed. If you can provide a raised bed, that's all the better. Raspberry Care Raspberry plants have relatively shallow root systems, so keeping a weed-free bed will minimize root competition. A layer of compost mulch helps a lot. As previously mentioned, suckers grow from travelling root systems. Keep an eye on canes that will pop up around your garden and prune them out if they're in inappropriate areas. As with most fruiting plants, take care not to allow your plants to dry out during the summer, especially as they're bearing fruit. For more information about growing and pruning, see our caning berries care sheet.
Read More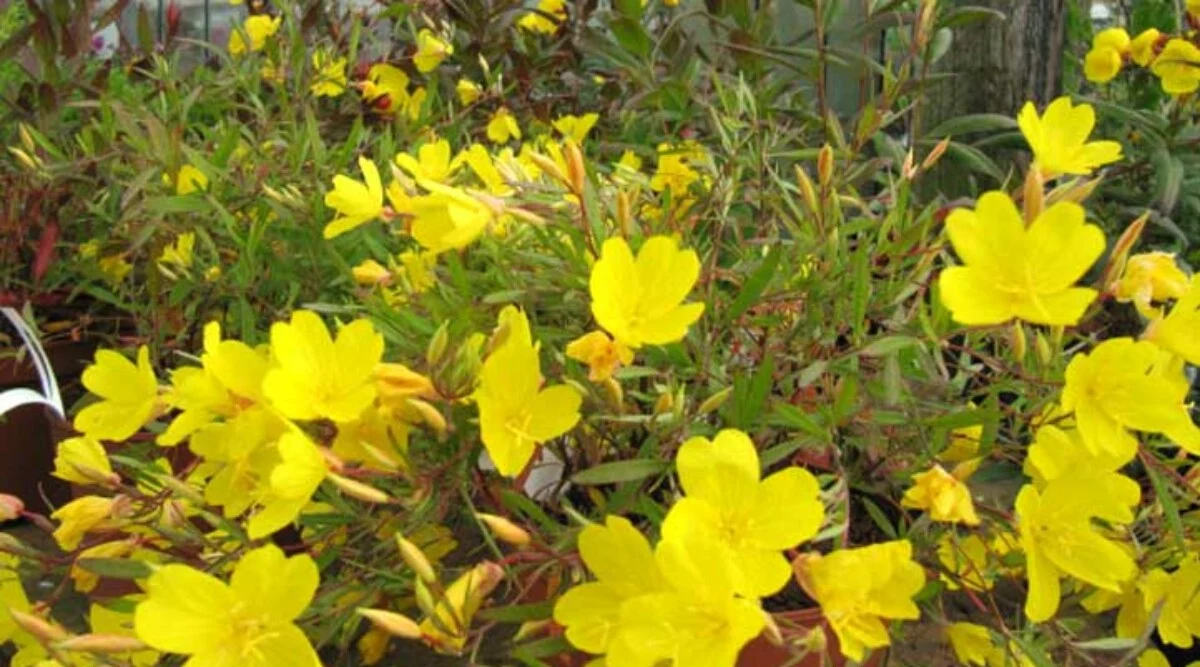
Oenothera fruticosa, or narrowleaf evening primrose, is a drought-tolerant plant. Our guide shares how to use it in your borders or xeriscape!Oenothera fruticosa, commonly known as Southern sundrops or sundrops, is a tall-standing, day-flowering plant that produces beautiful, terminal clusters of bright yellow flowers in late spring and summer. The lance-shaped, fresh green leaves of the Oenothera fruticosa are a little jagged. The plant is called sundrops, thanks to the cup-like flowers that bloom during the day. Even though each flower is short-lived, they grow in succession through a period of two months. You can grow this low-maintenance flowering plant in your garden under full sun as a xeriscape plant.The narrow-leaf primrose (Oenothera fruticosa) is a flowering plant that is part of the evening primrose family Onagraceae. It is native to many parts of Canada, Hawaii, Greenland, and Eastern North America, where you can find it growing in dry woodlands, wild gardens, moist savannas, and rocky outcrops. It is a tall herbaceous plant that grows to a height of 1-3′ ft. In your garden, grow pretty Oenothera fruticosa as a garden border and in your rocky or drought-tolerant gardens. Cottage gardens, native plant areas, rock gardens, and rock outcrops are perfect for this native plant of eastern North America. The sundrop tolerates poor soils, requires medium maintenance and attracts native bees at the same time. Botanically, this plant is a perennial wildflower with lanceolate leaves, pubescent leaf blades, red stems, and cup-like yellow blooms. In spring, reddish basal leaves form from overwintered seeds, and the plant matures and blooms in May and June. Unlike its relative primroses, this day-flowering member of the same family is a lovely wild plant that is perfect for beds designed to feed birds. Specifically, the seeds are a primary food source for the mourning dove. Even though sundrops are a particular species in the primrose family, they have two commonly grown cultivars – ‘Fireworks’ and ‘African Sun.’ The ‘Fireworks’ cultivar has dark yellow flowers that emerge from red buds. The foliage is deep bronze, and the stems have a slight tinge of red to them. ‘African Sun’ has bright yellow cup-like flowers, creating a gorgeous mat of yellow in your landscape.
Read More
The allspice tree produces both edible seeds used as spices, and leaves to add flavor to your dishes when fresh. Our guide shares more!The allspice tree is a lovely tree on its own and provides dried berries that make everyone’s favorite fall flavor: allspice. The tree is the only spice crop grown exclusively in the western hemisphere, and provided you have the right conditions you can grow it at home too! Allspice originates in Central America, South America, and the Caribbean. In these tropical areas, growers cultivate regional allspice trees that have distinct flavors. Each region has specific culinary uses for dried berries, and the result is an aromatic cuisine that is unforgettable. So what do allspice trees need to thrive? And how can home growers outside its tropical range help their trees produce berries and harvest them? Keep reading, and we’ll cover all these things, and more… like where the name allspice comes from.The allspice tree (Pimenta dioica) is commonly referred to as Jamaican pepper, myrtle pepper, pimenta, pimento, pimenta gorda, Jamaican allspice, Mexican allspice, and Guatemalan allspice. It was first cultivated by Maya and Aztec people in Central America, circa 2600 BC and 1250 AD, respectively. The name allspice came about because the flavor of the dried berries is similar to cloves, cinnamon, and nutmeg. There is only one species of allspice in the world. Pimenta dioica is a tropical, ornamental, evergreen shrub in the myrtle family that grows up to 59 feet tall. The tree’s bark is white-grey and peels in sheets like that of birch trees. The root system is deep and spreads wide. Allspice leaves are dark green, oblong, and leathery, and they are high in aromatic content. In mid-summer, the trees grow small white flowers on pyramidal stems that produce pea-sized green berries. Allspice trees are either male or female, and growers should encourage cross-pollination to produce berries. These clustered berries are removed when they’re still green for access to the delicious allspice flavor. They are then sun-dried on concrete until they are dark red and ground into allspice. It takes roughly 3 to 5 months for berries to form after the trees are pollinated. Allspice trees are native to Central America and the West Indies, specifically Jamaica, Mexico, Belize, Guatemala, Honduras, Brazil, and Leeward Isle. Allspice was historically used to preserve meats in the Caribbean, specifically Jamaica. It’s cultivated as a key ingredient in jerk seasoning, barbecues, curries, and stews. The spice is also popular in German and British cooking. It’s combined with nutmeg to make pumpkin pie spice in the US. The allspice tree leaves are used with smoked meats to provide a woodier, less intense flavor and aroma. The leaves lose flavor within a couple of days. Therefore they must be harvested and used right away. Cooking with allspice and a combination of other dried spices can fill your kitchen with a pungent aroma that you’ll seek out often.
Read More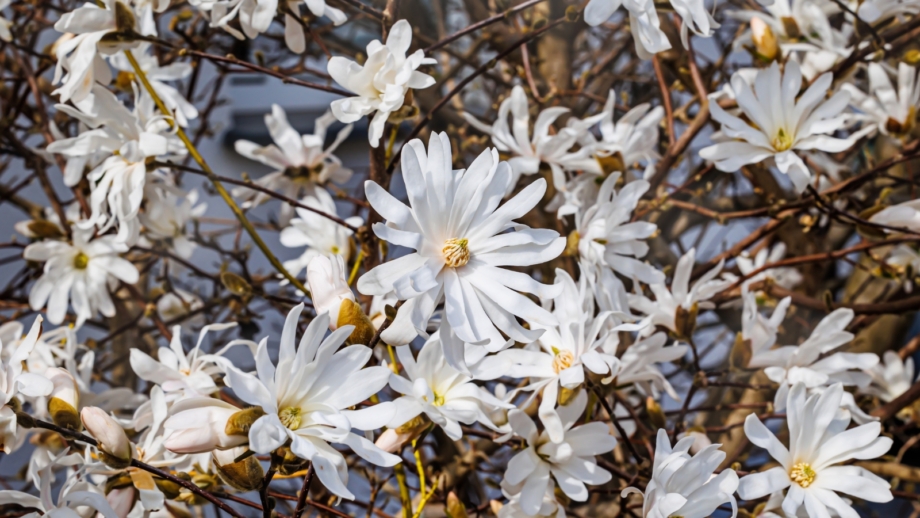
Deciduous magnolias may not be as well known as their evergreen cousins, but they are no less beautiful. Star magnolia is a stunning tree that falls into this group. Join gardening expert Melissa Strauss to talk about planting and caring for your own star magnolia. If you’re looking for a magnolia tree that can handle the cold, this Japanese native is the perfect pick. It is low-maintenance, widely adaptable, and hardy down to a whopping -30°F (-34°C)! Unlike its southern magnolia relatives, star magnolia trees are hardy to zone 4 and come from mountainous regions. Growing up in tropical zone 11, I had no idea how beautiful any of the magnolia trees were. Certainly, I had seen photos of their large, creamy white blooms, but without seeing one in person, it’s hard to grasp the true beauty of a plant. When in college in North Florida, I first encountered the Japanese magnolia. I was smitten from the first look. One smaller subset species worth adding to the garden is the star magnolia tree or Magnolia stellata. Here’s how to grow this showstopper! Japanese magnolias are wonderful blooming trees that prefer mild climates. They are more cold-tolerant than the evergreen types, so you can grow them in a wider range of climate zones. These deciduous trees produce incredibly beautiful flowers in spring, soft, attractive foliage in summer, and they even offer a bit of fall color. They are relatively easy to care for and require only a modicum of maintenance once established. This star of the garden is a flowering deciduous small tree or large shrub. Compact varieties of star magnolia trees may only reach 10 feet tall, while standard types may grow up to 25 feet at maturity. They are moderate growers, putting on between one and two feet per year, depending on their environment. In general, Japanese magnolia species are spring bloomers, though they vary by species. Star is an early bloomer, beginning in February, depending on the climate. The colder the climate, the later they bloom, up until about April. The flowers open from soft, fuzzy buds and look like large, white stars, which is where this species gets its name. The flowers are between one and four inches across and are usually pure white. A couple of cultivars have yellow undertones, and some have a touch of pink. Depending on the variety, they have between 7 and 30 petals and a light, pleasant fragrance. Rather than the rounded, tulip shape of other plants in the genus, these have elongated, straplike petals. Orange fruit cones develop over the summer and provide food for birds in the fall. They can have one or multiple trunks, depending on how you prune them while young. In general, they have more branching than other Japanese cultivars. The bark is attractive, lightly textured, and silvery gray. The foliage is soft and oblong. It changes to bronze in the fall, but it’s not particularly noteworthy in contrast to the spring blooming habit. Star magnolia trees are native to Japan, where they grow in the highlands of the island of Honshu. This part of the world has cool summers, cold winters, and quite a lot of snowfall. It’s a mountainous region, and higher elevations experience a greater fluctuation in climate. This species came to America in the 1860s. The ideal time to plant a star magnolia tree is while it is still dormant. In late winter, before the buds break, dig a hole that is two to three times the width and as deep as your root ball. Choose a location with some shelter from the wind, as a late frost with strong winds can harm developing buds. Water the tree well before planting to hydrate it, which reduces shock. It’s a great idea to amend your soil with compost to give it an extra boost from the beginning. Position your root ball in the hole and backfill, then water it thoroughly. For the first three to six months, water it two to three times per week. Once established, continue to water weekly in the absence of rain for the next two years. Applying a layer of mulch around the base will help hold in moisture, which magnolias appreciate. Leave some space around the trunk to avoid fungus and pest infestation.
Read MoreFind and share everyday cooking inspiration on Allrecipes. Discover recipes, cooks, and how-tos based on the food you love and the friends you follow.
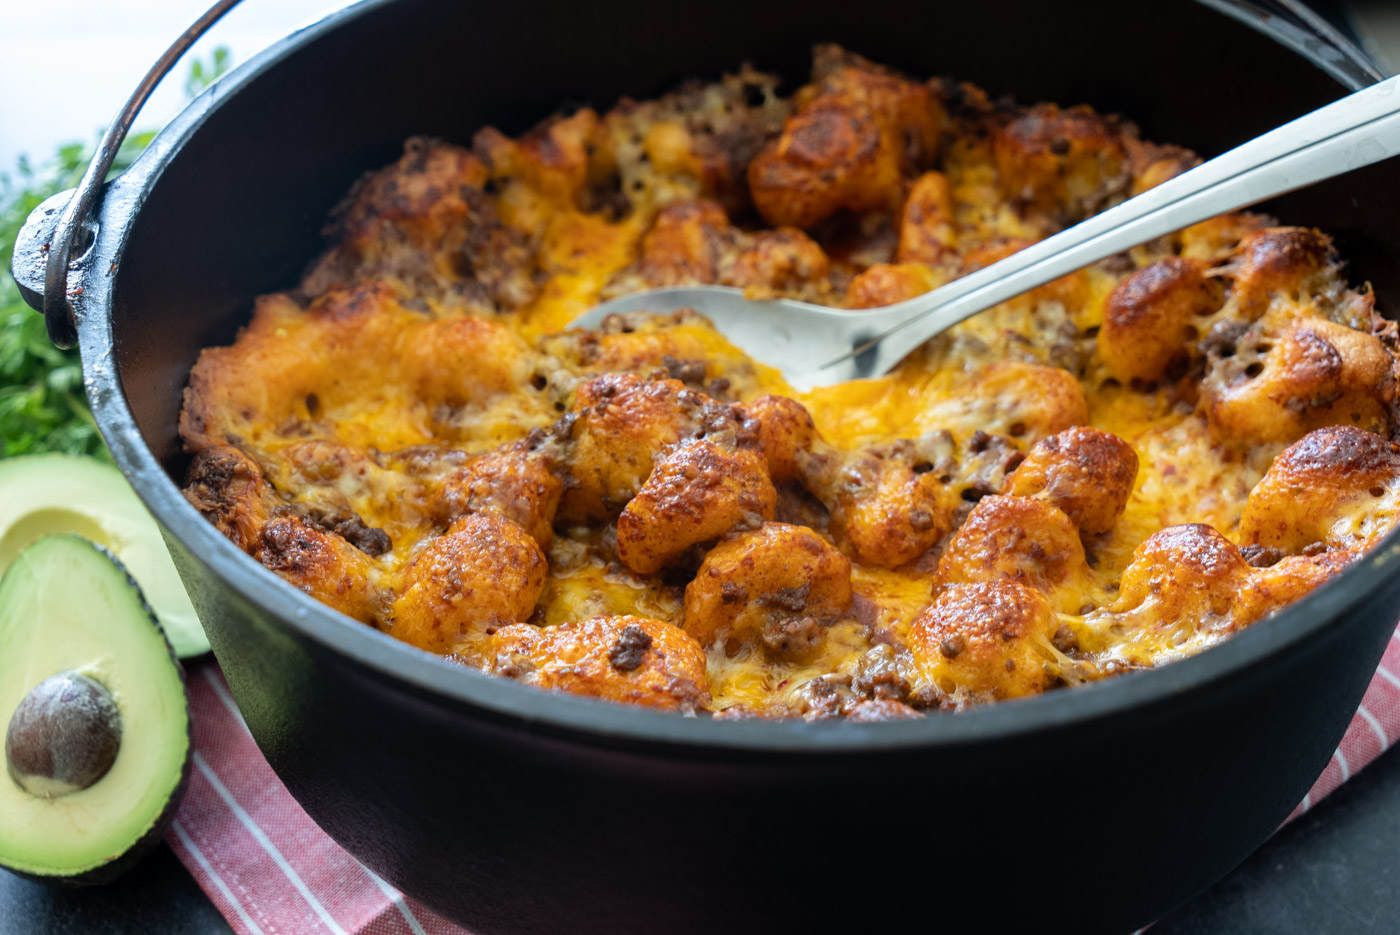
We’re hot and spicy… literally!
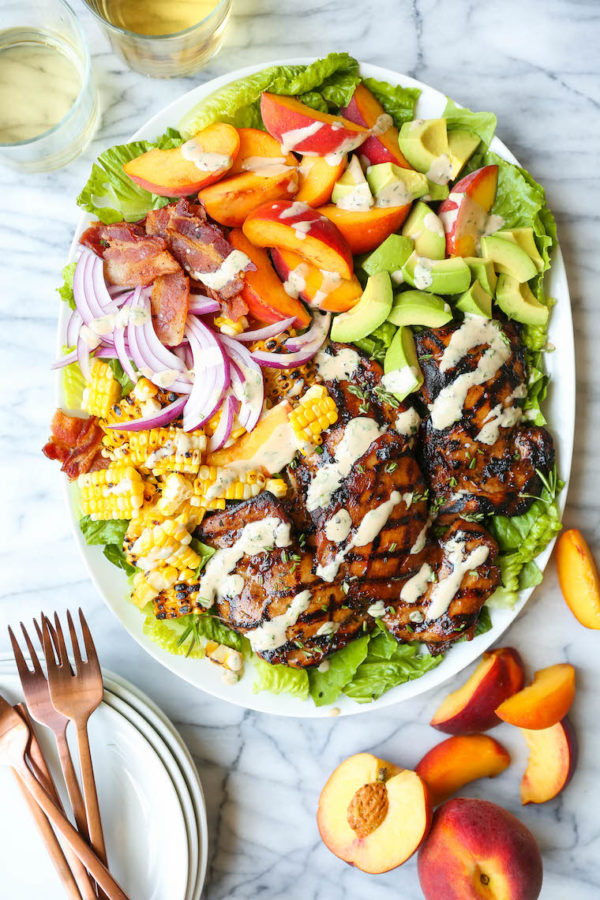
Peach slices, grilled rosemary-thyme chicken, charred corn kernels and crisp bacon with the creamiest balsamic dressing!
Read More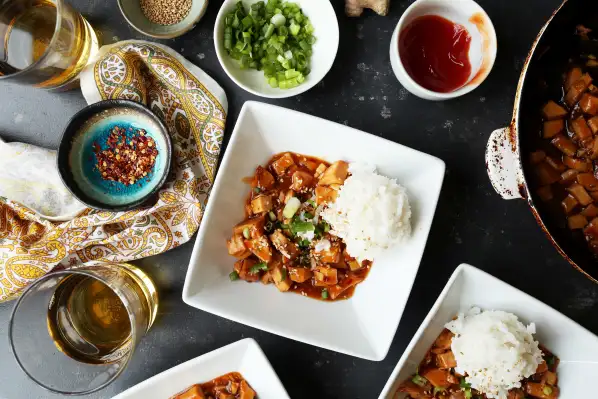
"I searched and finally found this recipe on the internet. It is a copycat of the Bourbon Chicken sold in Chinese carry-outs in my hometown. This recipe is so good that my sons gobble it up leaving me just a spoonful. Their excuse was they thought I had eaten. Editor's Note: Named Bourbon Chicken because it was supposedly created by a Chinese cook who worked in a restaurant on Bourbon Street."
Read MoreOur email newsletter delivers gardening solutions, new recipes and special
The Culinary Catalysts updates. It's always free and you can unsubscribe any time.
We really want to enable home cooks, all things being equal, to plan delightful and exceptional dinners in their own kitchen.
Know More